
All about Authentication in NodeJS (1/3) : The Fundamentals
Understanding from a beginners perspective.


Hi 🙋🏽♂️, I hope you are in good health in these tough times. In this three-part blog series we will be understanding authentication in a web application. This is the first part where we will learn about authentication in brief and will build a simple login system in NodeJS. In the second part, we will use a popular library called passport.js . It's simple, unobtrusive authentication middleware for NodeJS. So let's begin quickly✨
The first question that comes in our mind is ...
What is Authentication?
Authentication is the process of verifying the identity of users who visits a particular web application.
In almost all modern applications users are authenticated using several techniques to serve personalized content. A unique identifier is associated with the user. Traditionally a combination of username/email/ID with a strong password is used to identify the user.
For example, in a typical E-Commerce application, certain actions can be done without logging in like view product details. Actions like adding items to the cart, checking out, and getting personalized recommendations can only be achieved by logging into the system.

Why Authentication?
Following are some reasons why we should use authentication in our apps :
- To store user identity for future verification via identifiers and passwords.
- To perform restricted actions which require the user to be logged in.
- To serve personalized feed/content.
Types of Authentication
Single Factor Authentication : This is the simplest and most common form. It requires only one authentication method, a password or PIN to grant access to the user. They are typically associated with poor security and can be easily guessed or stolen via data breaches, phishing, or using keyloggers.
Two Factor Authentication : Adding a layer of complexity, 2FA requires a second factor to verify a user’s identity. Common examples include tokens generated by a registered device, OTP's, or PINs. The mere presence of two authentication methods improves your security posture significantly—in fact, according to research from Symantec, 80% of data breaches can be prevented by 2FA.
Multi-Factor Authentication : Multi-Factor Authentication (MFA) is the most sophisticated authentication method that leverages 2 or more independent factors to grant user access to a system. In typical scenarios, MFA methods leverage at least 2 or 3 of the following categories : a password or PIN, a mobile device or security token, Fingerprint or FaceID, and user location.
However, in this series of articles, we will be using the Single Factor Authentication method.
How to implement?
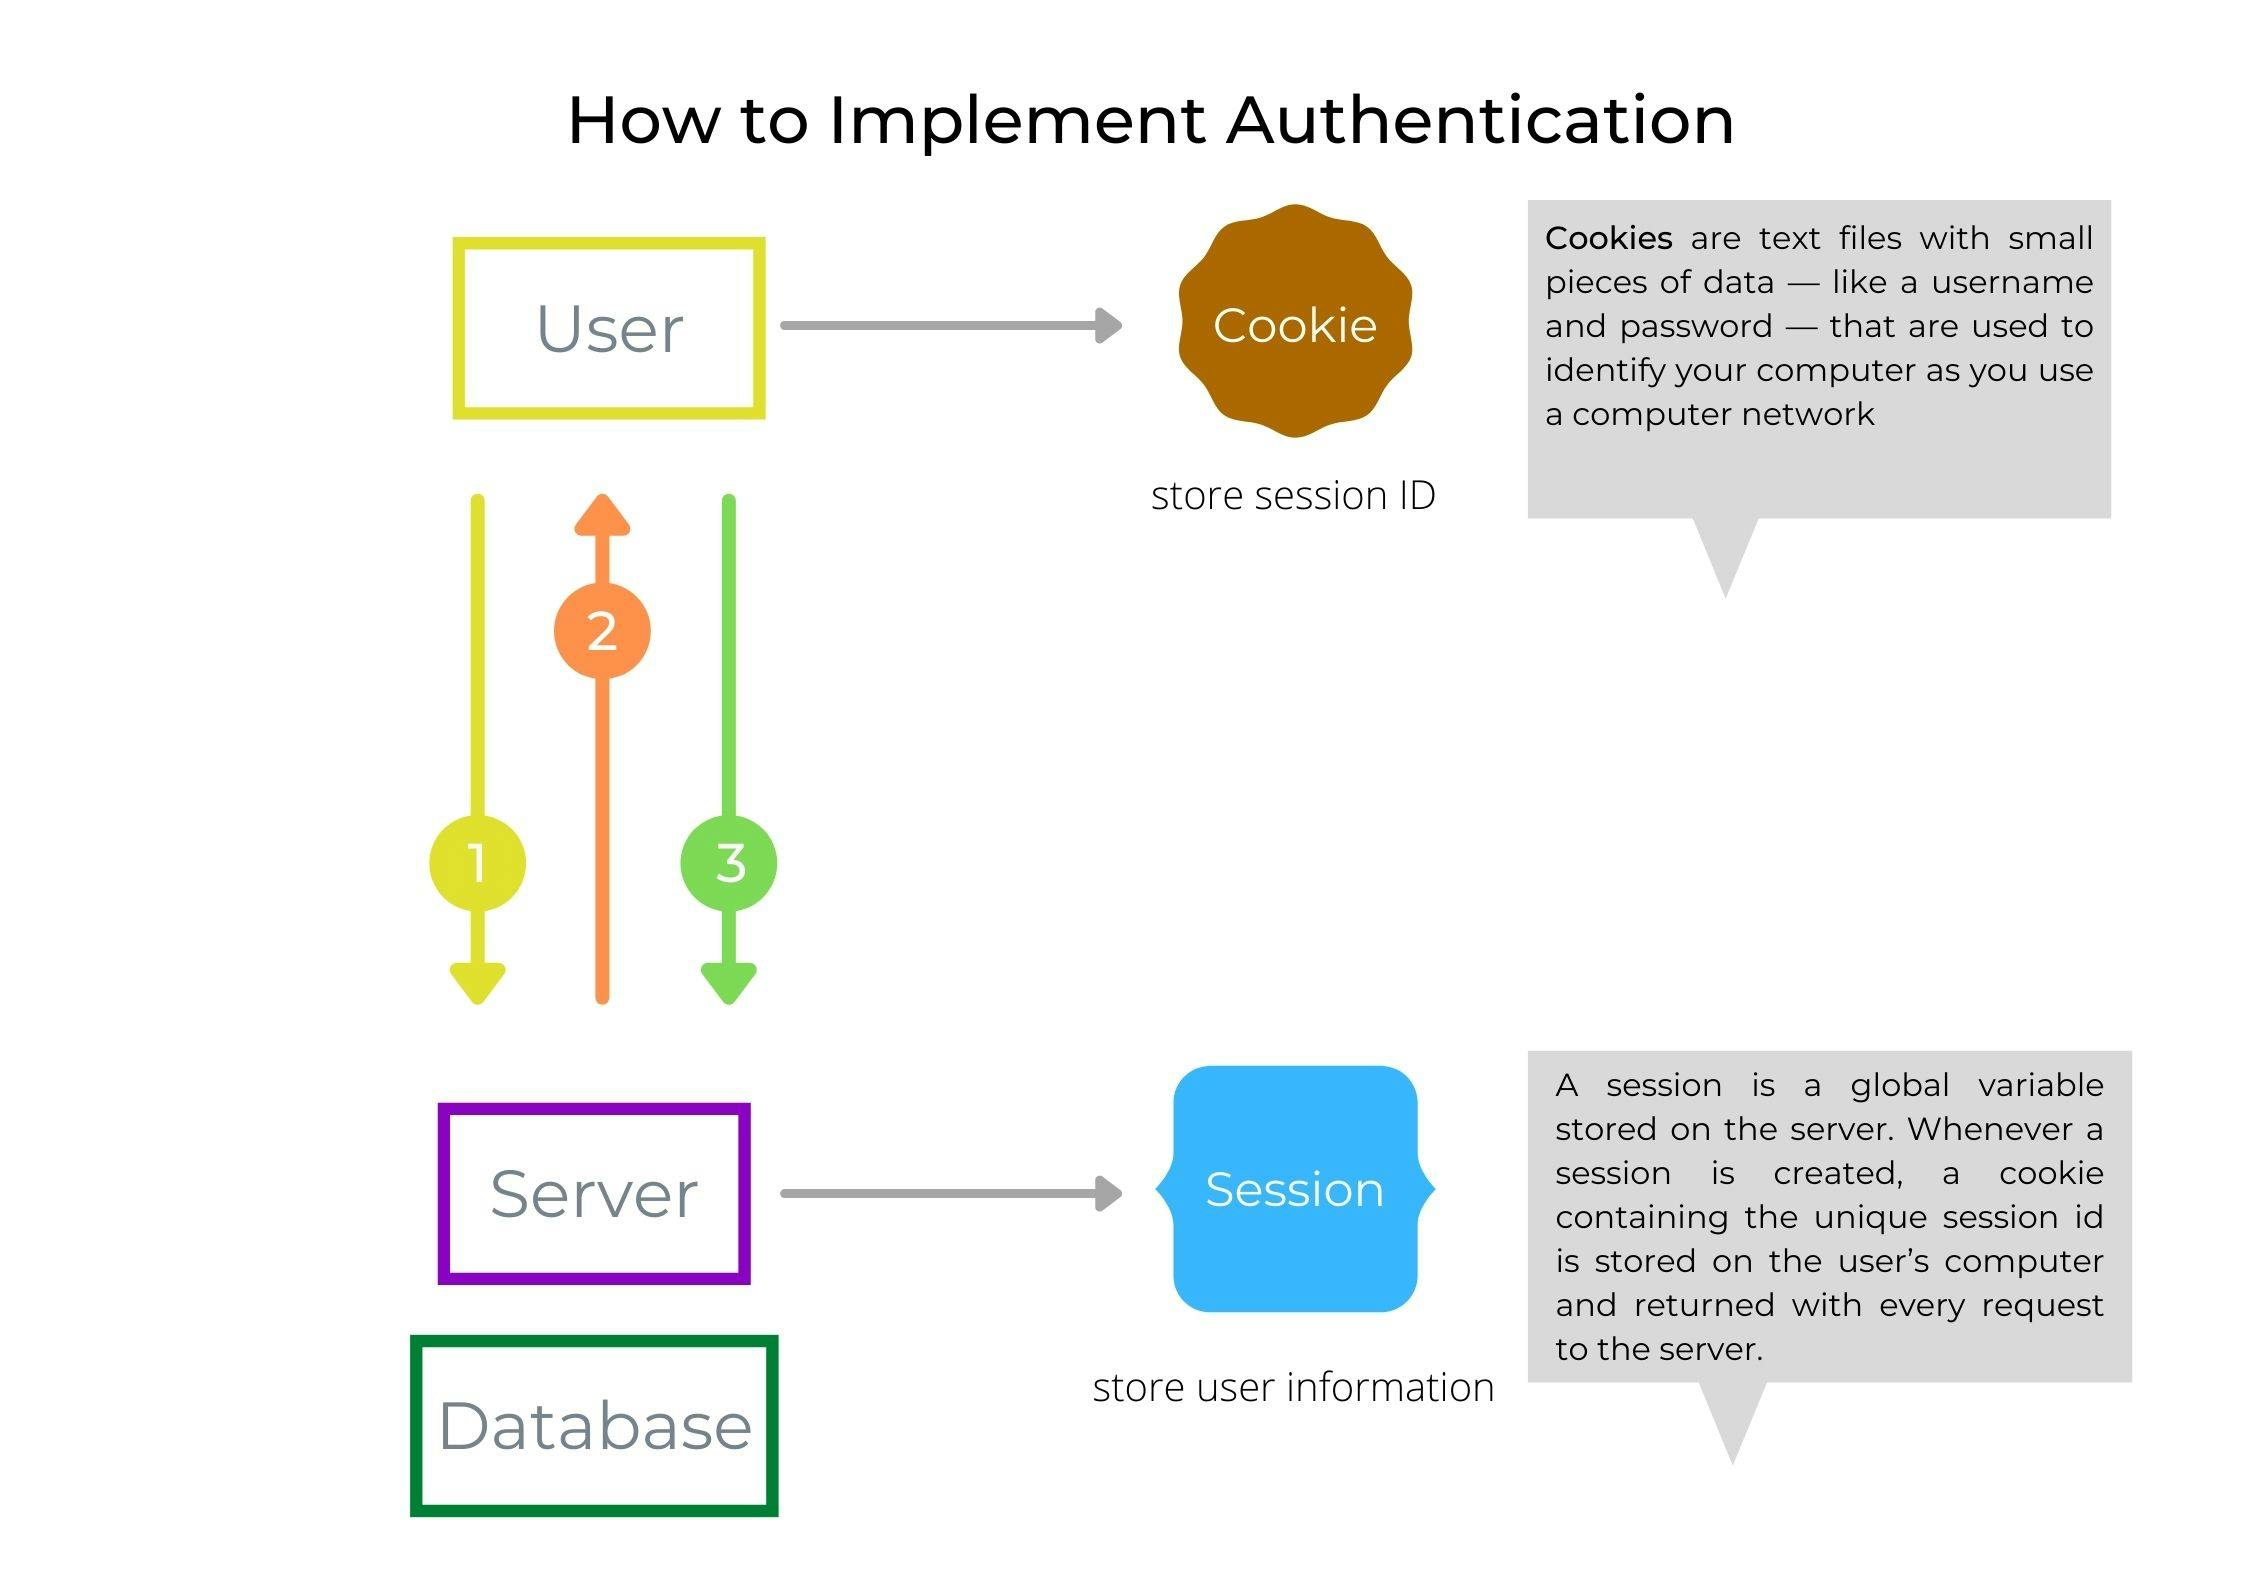
Above is the pictorial representation of the workflow in implementing authentication. Let's break it down step by step.
- New login request : When a new user visits a website, he/she will be prompted to sign up. A typical sign-up / registration form with required details like Username, email, password, etc are to be filled.
Saving user on server side : As soon as the sign-up form is submitted, the server stores the information of this user in a database & also generates a session in reference to this user. This session is stored in the database and the session id is sent back to the client as a cookie.
Stable connection : The received cookie is stored in the client's machine and will be sent with request headers for every request made henceforth. By this cookie that stores encrypted session-id, the server will recognize this client and serve accordingly.
A Cookie is a small file with a maximum size of 4KB that the web server stores on the client computer. Once a cookie has been set, all page requests that follow return the cookie name and value. A cookie can only be read from the domain that it has been issued from.
A Session is a global variable stored on the server. Each session is assigned a unique id which is used to retrieve stored values. Whenever a session is created, a cookie containing the unique session id is stored on the user’s computer and returned with every request to the server. If the client browser does not support cookies, the unique session id is displayed in the URL. Sessions have the capacity to store relatively large data compared to cookies. The session values are automatically deleted when the browser is closed. If you want to store the values permanently, then you should store them in the database.
And this sums up pretty much to understand the basics of the authentication flow. Enough of talks, let's make a simple login system in NodeJS.
Project Setup
Prerequisite : To begin you should have a basic understanding of NodeJS, ExpressJS & MongoDB.
Create a project folder name "authentication-nodejs". Open this folder with your favorite IDE (Visual Studio Code recommended).
Create a file app.js, this will be the entry point of your project. Initialize npm or yarn whichever package manager you prefer. I'll be using npm. We"ll need a few libraries to get started. Open your terminal and install these packages by the command
npm install express mongoose express-session connect-mongodb-session ejs bcrypt dotenv
Let's see what all these packages are :
- express : Express is a minimal and flexible Node.js web application framework that provides a robust set of features for web and mobile applications.
- mongoose : Mongoose is a MongoDB object modeling tool designed to work in an asynchronous environment. Mongoose supports both promises and callbacks.
- express-session : Session management can be done in node.js by using the express-session module. It helps in saving the data in the key-value form. In this module, the session data is not saved in the cookie itself, just the session ID.
- connect-mongodb-session : It's a MongoDB backed session storage module which works well with express.
ejs : It's a templating engine.
bcrypt : A library to help you hash passwords.
dotenv : It is a package used to manage environment variables.
You can also add an optional development package nodemon which is a tool that helps develop node.js based applications by automatically restarting the node application when file changes in the directory are detected.
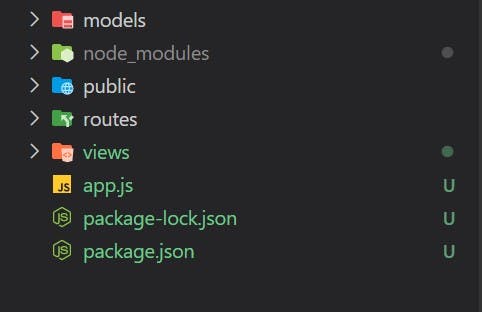
Now create the following folders in root directory:
- views : This folder will contain all the HTML pages which are sent to the client.
- public : It is used to store all static files such as CSS, images, and javascript files.
- routes : All your routes will be stored in this folder.
- models : This folder should contain all the models for our database. We are going to create a User model with help of mongoose.
Your folder structure will look like this
First we'll build the pages in the views folder. Create 3 new files login.ejs, register.ejs, dashboard.ejs.
For login.ejs
<!DOCTYPE html>
<html lang="en">

<head>
    <meta charset="UTF-8">
    <meta name="viewport" content="width=device-width, initial-scale=1.0">
    <title>Login</title>
    <!-- Latest compiled and minified CSS -->
    <link href="https://cdn.jsdelivr.net/npm/bootstrap@5.0.0-beta3/dist/css/bootstrap.min.css" rel="stylesheet"
        integrity="sha384-eOJMYsd53ii+scO/bJGFsiCZc+5NDVN2yr8+0RDqr0Ql0h+rP48ckxlpbzKgwra6" crossorigin="anonymous">
    <link rel="preconnect" href="https://fonts.gstatic.com">
    <link href="https://fonts.googleapis.com/css2?family=Poppins&display=swap" rel="stylesheet">
    <link rel="stylesheet" href="/css/main.css">
</head>

<body>
    <div class="form-wrapper">
        <h2 class="text-center ftsz-24 my-2">Login</h2>
        <p class="status text-center" style="color: #fff;">
        </p>
        <form method="POST" action="/login">
            <div class="form-group row ">
                <label for="Email" class="col-sm-3 col-form-label">Email</label>
                <div class="col-sm-9">
                    <input type="email" class="form-control" id="email" name="email" >
                </div>
            </div>
            <div class="form-group row ">
                <label for="Password" class="col-sm-3 col-form-label">Password</label>
                <div class="col-sm-9">
                    <input type="password" class="form-control" id="password" name="password">
                </div>
            </div>
            <div class="form-group login-btn row mt-4">
                <button id='login' type="submit" class="btn  col-sm-8 offset-sm-2 text-center">Login</button>
            </div>
        </form>
        <div class="other-action">
            <a href="/register">Register</a>
        </div>
    </div>
    <script src="https://cdn.jsdelivr.net/npm/bootstrap@5.0.0-beta3/dist/js/bootstrap.bundle.min.js"
        integrity="sha384-JEW9xMcG8R+pH31jmWH6WWP0WintQrMb4s7ZOdauHnUtxwoG2vI5DkLtS3qm9Ekf"
        crossorigin="anonymous"></script>
</body>
</html>
For register.ejs
<!DOCTYPE html>
<html lang="en">

<head>
    <meta charset="UTF-8">
    <meta name="viewport" content="width=device-width, initial-scale=1.0">
    <title>Login</title>
    <!-- Latest compiled and minified CSS -->
    <link href="https://cdn.jsdelivr.net/npm/bootstrap@5.0.0-beta3/dist/css/bootstrap.min.css" rel="stylesheet"
        integrity="sha384-eOJMYsd53ii+scO/bJGFsiCZc+5NDVN2yr8+0RDqr0Ql0h+rP48ckxlpbzKgwra6" crossorigin="anonymous">
    <link rel="preconnect" href="https://fonts.gstatic.com">
    <link href="https://fonts.googleapis.com/css2?family=Poppins&display=swap" rel="stylesheet">
    <link rel="stylesheet" href="/css/main.css">
</head>

<body>
    <div class="form-wrapper">
        <h2 class="text-center ftsz-24 my-2">Register</h2>
        <p class="status text-center" style="color: #fff;">
        </p>
        <form method="POST" action="/register">
            <div class="form-group row ">
                <label for="Email" class="col-sm-3 col-form-label">Name</label>
                <div class="col-sm-9">
                    <input type="text" class="form-control" id="name" name="name">
                </div>
            </div>
            <div class="form-group row ">
                <label for="Email" class="col-sm-3 col-form-label">Email</label>
                <div class="col-sm-9">
                    <input type="email" class="form-control" id="email" name="email">
                </div>
            </div>
            <div class="form-group row ">
                <label for="Password" class="col-sm-3 col-form-label">Password</label>
                <div class="col-sm-9">
                    <input type="password" class="form-control" id="password" name="password">
                </div>
            </div>
            <div class="form-group login-btn row mt-4">
                <button id='login' type="submit" class="btn  col-sm-8 offset-sm-2 text-center">Register</button>
            </div>
        </form>
        <div class="other-action">
            <a href="/login">Login</a>
        </div>
    </div>
    <script src="https://cdn.jsdelivr.net/npm/bootstrap@5.0.0-beta3/dist/js/bootstrap.bundle.min.js"
        integrity="sha384-JEW9xMcG8R+pH31jmWH6WWP0WintQrMb4s7ZOdauHnUtxwoG2vI5DkLtS3qm9Ekf"
        crossorigin="anonymous"></script>
</body>

</html>
For dashboard.ejs
<!DOCTYPE html>
<html lang="en">

<head>
    <meta charset="UTF-8">
    <meta name="viewport" content="width=device-width, initial-scale=1.0">
    <title>Login</title>
    <!-- Latest compiled and minified CSS -->
    <link href="https://cdn.jsdelivr.net/npm/bootstrap@5.0.0-beta3/dist/css/bootstrap.min.css" rel="stylesheet"
        integrity="sha384-eOJMYsd53ii+scO/bJGFsiCZc+5NDVN2yr8+0RDqr0Ql0h+rP48ckxlpbzKgwra6" crossorigin="anonymous">
    <link rel="preconnect" href="https://fonts.gstatic.com">
    <link href="https://fonts.googleapis.com/css2?family=Poppins&display=swap" rel="stylesheet">
    <link rel="stylesheet" href="/css/main.css">
</head>

<body>
    <div class="form-wrapper">
        <h2 class="text-center ftsz-24 my-2">Dashboard</h2>
        <p class="status text-center" style="color: #fff;">
        </p>
        <div class="dashboard">
            <h3>Hello User, you are logged in</h3>
            <div class="other">
                <a id="logout" href="/logout">Logout</a>
            </div>
        </div>
    </div>
    <script src="https://cdn.jsdelivr.net/npm/bootstrap@5.0.0-beta3/dist/js/bootstrap.bundle.min.js"
        integrity="sha384-JEW9xMcG8R+pH31jmWH6WWP0WintQrMb4s7ZOdauHnUtxwoG2vI5DkLtS3qm9Ekf"
        crossorigin="anonymous"></script>
</body>

</html>
You can add your own styling or just copy-paste the below one in public/css/main.css
* {
    margin: 0;
    padding: 0;
    box-sizing: border-box;
}
body {
    font-family: "Poppins";
    background-color: #004a7c;
}
.form-wrapper {
    position: absolute;
    top: 50%;
    left: 50%;
    transform: translate(-50%, -50%);
    width: 480px;
    background-color: #fbe0c4;
    color: #3f3f3f;
    border-radius: 24px;
    box-shadow: 4px 4px 16px 4px #013253;
}
form {
    margin: 0.5rem 0;
    color: #3f3f3f;
}
.form-control:focus {
    box-shadow: none;
}
form .form-group {
    margin: 2rem 0;
}
.form-wrapper h2 {
    font-weight: bold;
    color: #3f3f3f;
}
form .btn {
    background-color: #2696be;
    color: #e0e0e0;
    font-size: 1rem;
    font-weight: bold;
}
button:hover {
    color: rgb(247, 246, 246);
}

.other-action {
    display: flex;
    flex-direction: row;
    justify-content: space-around;
    margin: 1rem 0;
}
a {
    color: #3f3f3f;
    text-decoration: none;
}
a:hover {
    text-decoration: none;
    color: #3f3f3f;
}

.dashboard {
    min-height: 400px;
    display: flex;
    flex-direction: column;
    justify-content: space-between;
    text-align: center;
    padding-bottom: 1rem;
}
@media (max-width: 576px) {
    .form-wrapper {
        width: 90vw;
    }
    form .form-group {
        margin: 1rem 0;
    }
}
To work with MongoDB either you should create a local setup or in Atlas cloud. Make sure it's properly running and you have a connection string. Create a .env file in the root directory and store this connection string as a mongoDBURI variable.
mongoDBURI = <connectionstring>
Now create a user.js file in models folder. This will be our User model in mongoose.
const mongoose = require("mongoose");
const userSchema = mongoose.Schema({
    name: {
        type: String,
        required: true
    },
    email: {
        type: String,
        required: true
    },
    password: {
        type: String,
        required: true
    },
});

const User = mongoose.model("User", userSchema);

module.exports = User;
Let's begin with configuring our app. In app.js write the following code
//imports
const express = require("express");
const path = require("path");
const mongoose = require("mongoose");
const session = require("express-session");
const MongoDBSession = require("connect-mongodb-session")(session);
const authRoutes = require("./routes/authRoutes.js");
require("dotenv").config();

//app config
const PORT = process.env.PORT || 3000;
const app = express();
app.use(express.json());
app.use(express.urlencoded({ extended: false }));
app.use(express.static(path.join(__dirname, "public")));
app.set("view engine", "ejs");
app.set("views", "views");

//connect-mongodb-session config
const store = new MongoDBSession({
    uri: process.env.mongoDBURI,
    collection: "userSessions",
});

//session config
app.use(
    session({
        secret: "super secret key",
        resave: false,
        saveUninitialized: false,
        store: store,
    })
);

//routes

app.use(authRoutes);


mongoose
    .connect(process.env.mongoDBURI, {
        useNewUrlParser: true,
        useUnifiedTopology: true,
    })
    .then(() => {
        app.listen(PORT, () => {
            console.log(`listening on port ${PORT}`);
        });
    })
    .catch(() => {
        console.log(`Server throwed up`);
    });
A lot of important things have happened here. Let's understand it one by one.
1. Default express configuration: Initialized express app, configured default URL encoding, declared a static folder named "public", and ejs templating configs.
2. Configuring session: To use sessions our application must under the hood use express-session and some options.
secret : - This is the secret used to sign the session ID cookie. This can be either a string for a single secret or an array of multiple secrets.
resave : - Forces the session to be saved back to the session store, even if the session was never modified during the request. Typically, you'll want false.
saveUninitialized : - Forces a session that is "uninitialized" to be saved to the store. A session is uninitialized when it is new but not modified. Choosing false is useful for implementing login sessions, reducing server storage usage, or complying with laws that require permission before setting a cookie.
store : - The session store instance, defaults to a new MemoryStore instance. We'll be using MongoDB to store our sessions. So another helper module called "connect-mongodb-session" is used. A new MongoDBSession instance is created and passed to this storage option.
3. Mongoose and server : Finally we are connecting our database to the application and then listening on port 3000.
Our app is ready to run. If your using nodemon then create a start script in package.json and hit npm start. Else hit node app.js.
Note : In latter, you need to re-run the app after every change.
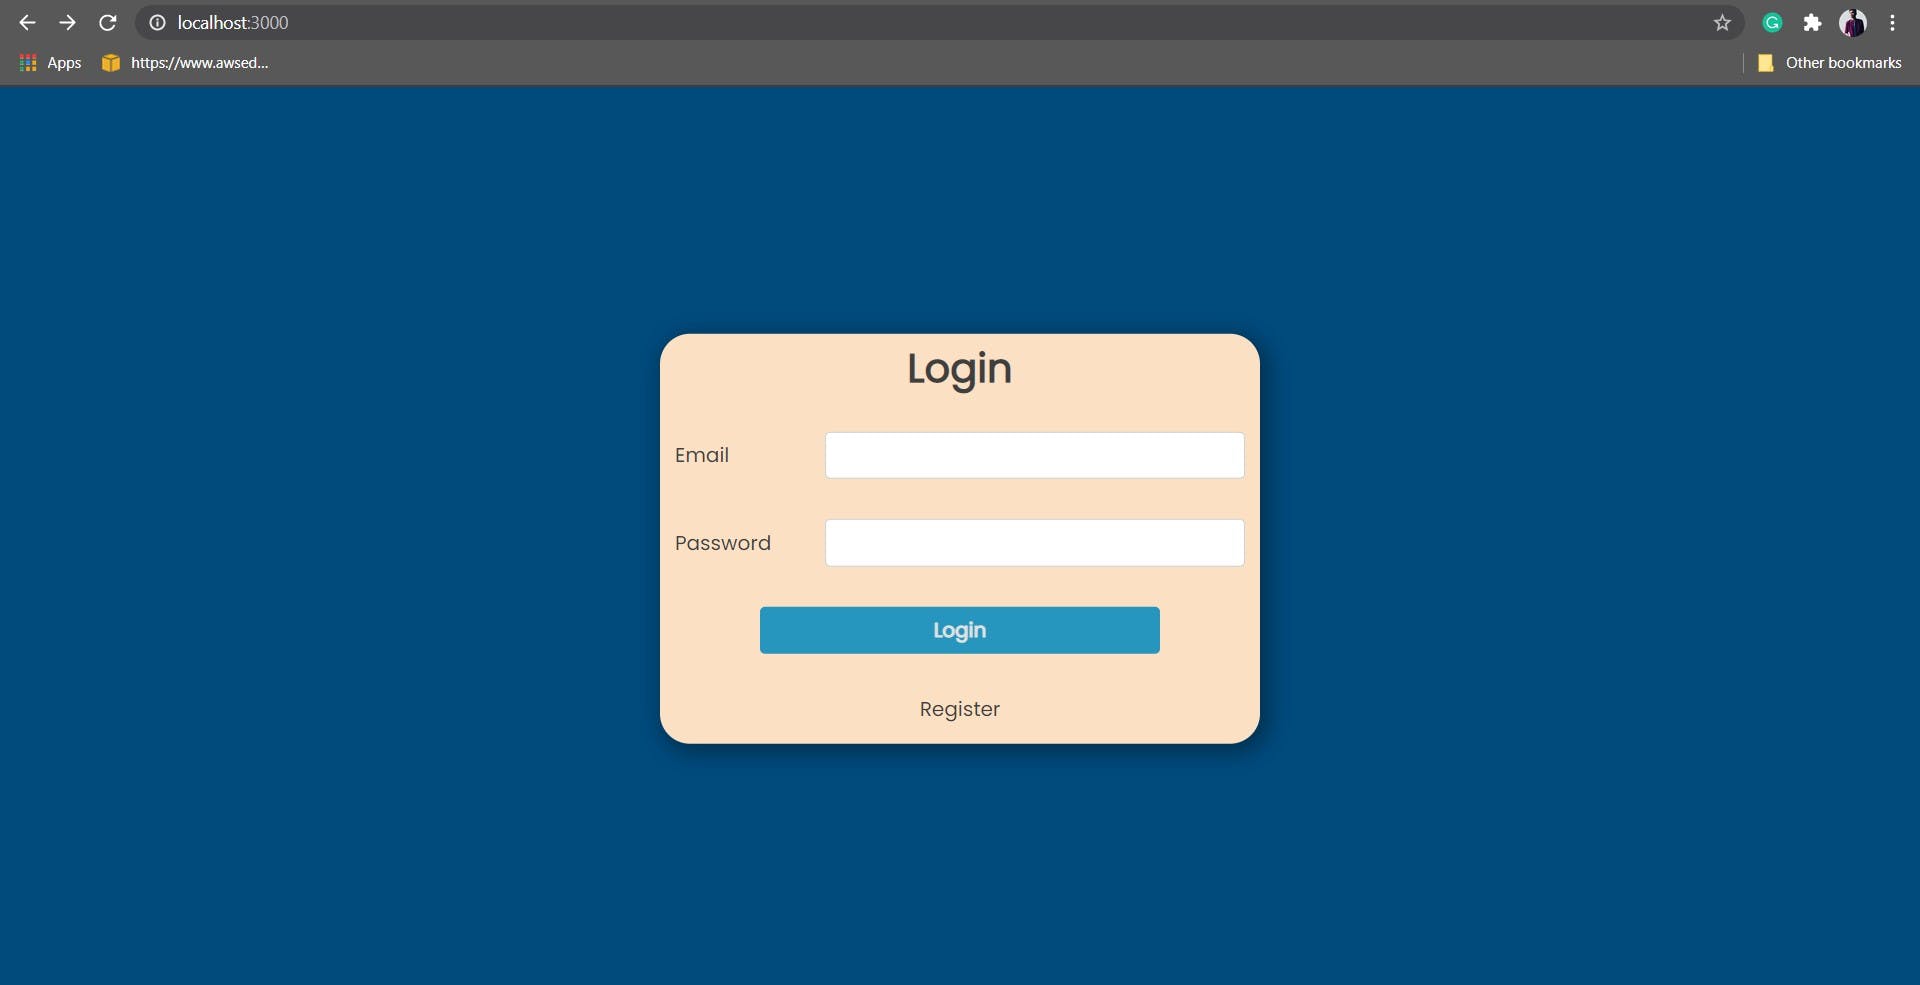
At http://localhost:3000 you will see something like this
Initially there's no user save in the database, so lets create middleware to register users. Create a new file authRoutes.js in the routes folder.
const router = require("express").Router();
const bcrypt = require("bcrypt");
const User = require("../models/User.js");

//auth checking middleware
const isAuth = (req, res, next) => {
    if (req.session.isAuthenticated) {
        return next();
    }
    res.redirect("/");
};

//register routes
router.get("/register", (req, res, next) => {
    res.render("register");
});

router.post("/register", async (req, res, next) => {
    const { name, email, password } = req.body;
    try {
        //check if already registered
        const alreadyUser = await User.findOne({ email: email });
        if (alreadyUser) {
            return res.redirect("/");
        }
        //password hashing
        const hashedPassword = await bcrypt.hashSync(password, 12);
        //save new user
        const newUser = new User({
            name,
            email,
            password: hashedPassword,
        });
        const saved = await newUser.save();
        if (!saved) {
            return res.redirect("/register");
        }
        console.log(`user saved`);
        res.render("login");
    } catch (error) {
        console.log(error);
        res.render("register");
    }
});

//login routes
router.get("/", (req, res, next) => {
    res.render("login");
});

router.post("/login", async (req, res, next) => {
    //handling login
});

//dashboard routes (protected)
router.get("/dashboard", isAuth, (req, res, next) => {
    //logged in successfully, dashboard page
    res.render("dashboard");
});

module.exports = router;
Notice that we use a password hashing technique to store our password in the database. We should never store passwords in plain text. In case of a data breach, hackers will have access to exact passwords.
To prevent this we use password hashing technique.
Hashing basically means to transform the data into a string of fixed length using a hash function.
Still, it's vulnerable because attackers can use Brute-Force, Dictionary, or Rainbow Table attack to crack the hashed strings. There are better hashing techniques to get more secured. Do learn about them later. To know more about password hashing see this.
Also to protect our dashboard routes, we made a custom authentication checking middleware called isAuth. It checks if req.session.isAuthenticated is true or not. Note : This isAuthenticated is a custom variable. You can use any name you want. The point is that for every new session it will check for the value of this variable. Once set to true, it will remain valid till the session is not expired. The session is expired when the user closes the tab/browser. Henceforth every request to the dashboard route will have to pass by isAuth middleware and if failed, redirect to the login page.
Go ahead run it and register a new user. Now let's write login middleware. In authRoutes.js add these
//notAuth checking middleware
const isNotAuth = (req, res, next) => {
    if (!req.session.isAuthenticated) {
        return next();
    }
    res.redirect("/dashboard");
};
//login routes
router.get("/", isNotAuth, (req, res, next) => {
    //user is not logged in
    res.render("login");
});

router.post("/login", async (req, res, next) => {
    const { email, password } = req.body;
    try {
        //check for user in database
        const validUser = await User.findOne({ email: email });
        if (!validUser) {
            return res.redirect("/");
        }
        //check for matched password
        const passwordMatched = await bcrypt.compare(
            password,
            validUser.password
        );
        if (!passwordMatched) {
            return res.redirect("/");
        }
        //if all clear, set authentication variable to true & redirect to dashboard
        req.session.isAuthenticated = true;
        res.redirect("/dashboard");
    } catch (error) {
        console.log(error);
        res.redirect("/login");
    }
});

//dashboard routes (protected)
router.get("/dashboard", isAuth, (req, res, next) => {
    //logged in successfully, dashboard page
    res.render("dashboard");
});
In the login handler, we checked the user and password. If all clear then set the session authentication variable to true and redirected to the dashboard. When a user is logged in, he/she should not see the login page again, instead, the dashboard page must be shown. To do this we created a isNotAuth checking middleware.
Our app is ready. You can now log in and reach the protected dashboard. Here's how it looks
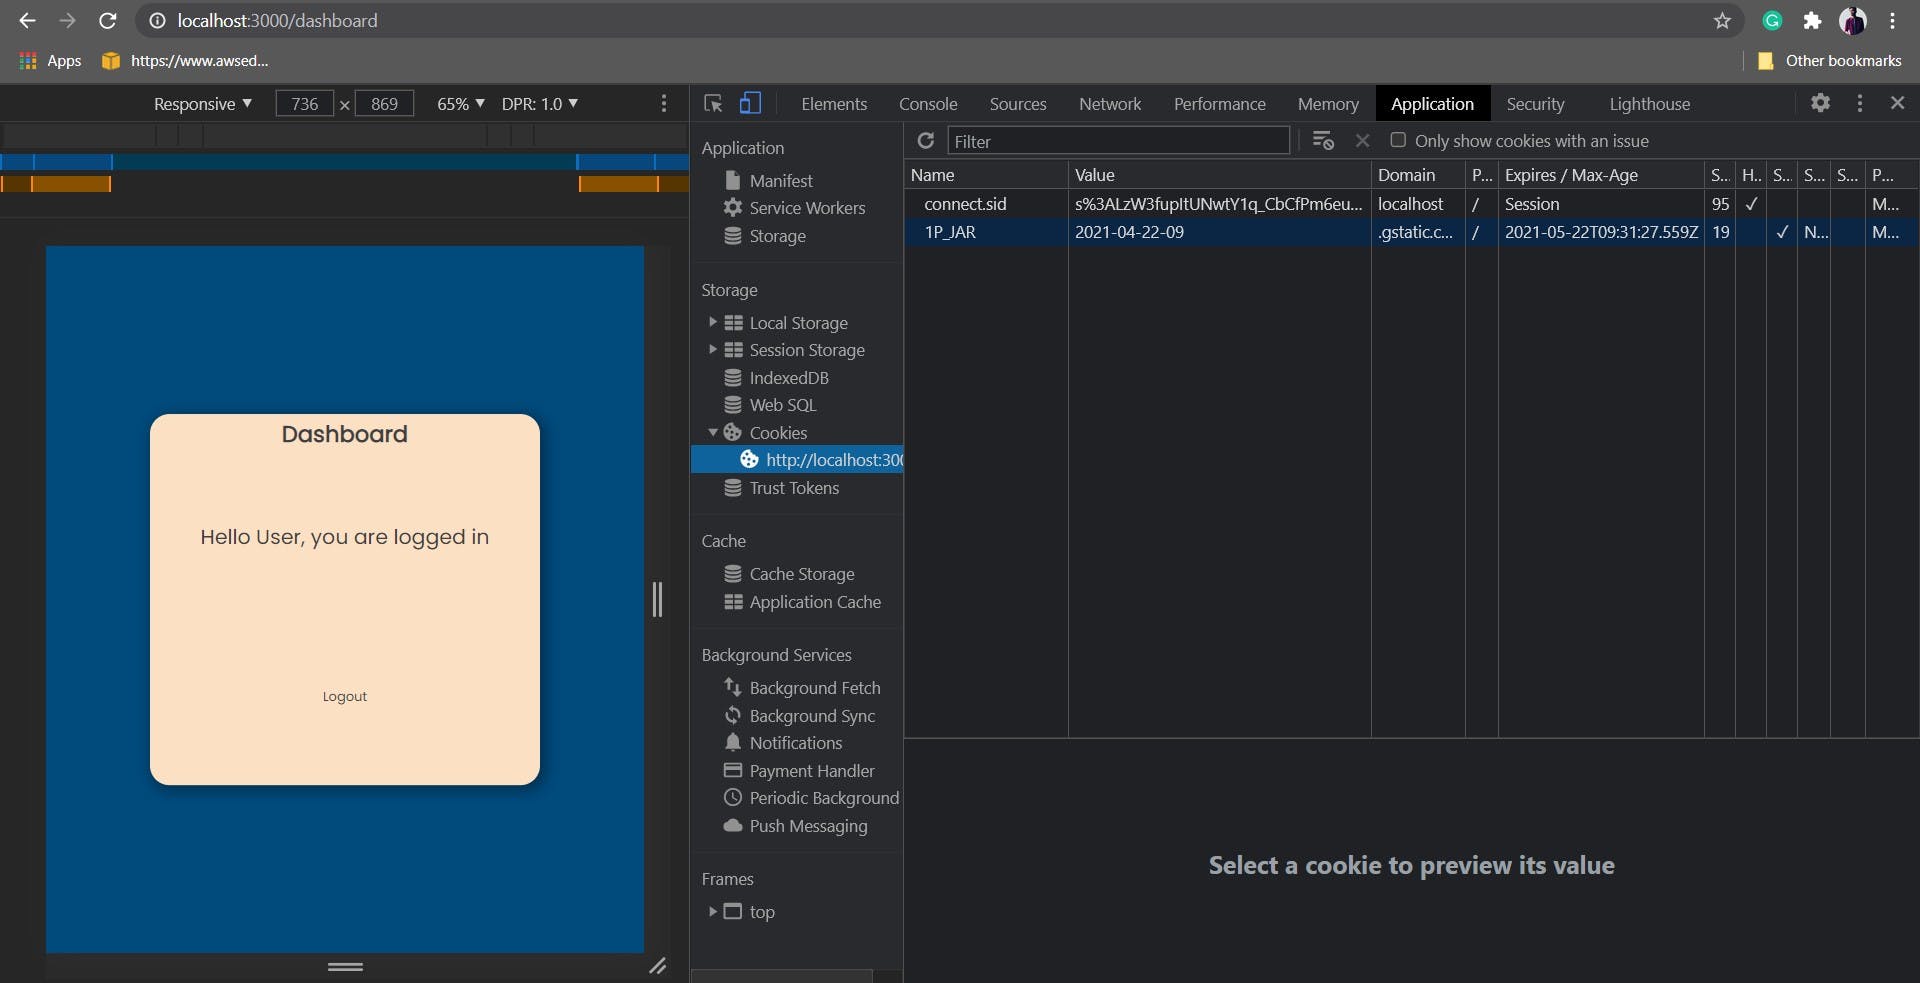
You can see the cookie named session-id in Chrome developer tools - Application - Cookies.
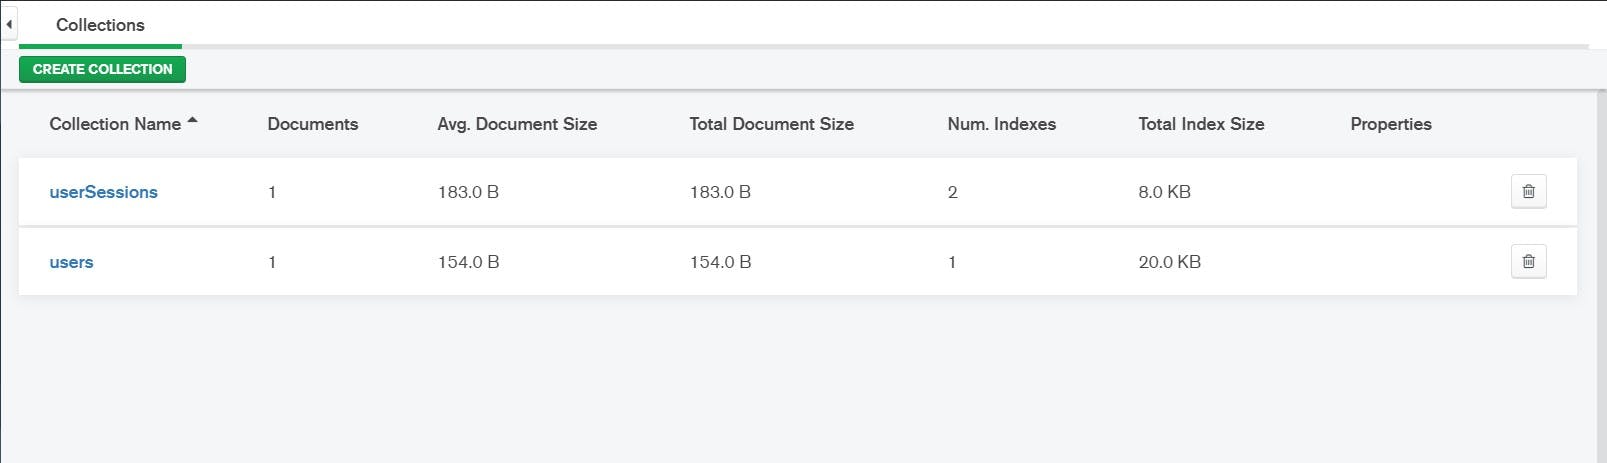 Users and sessions are stored in the database.
That was it. We learned about Authentication and build a simple login system. In the next part, we will be using passport.js to see how it works. Here's a link to my Back-End Engineering series. You will find all backend-related stuff there. Thanks for reading, any suggestions and improvements are welcomed. I am a beginner too and I believe in learning and sharing knowledge.