
All about Authentication (2/3) : Passport.js and OAuth
Using Passport with local and OAuth strategies.


Welcome back to another part of my All about Authentication series. In the previous blog, we learned about Authentication in brief. If you haven't read it, here's the link.
In this article, we'll learn about passport.js, how to use it in our application, different strategies using passport, and also use OAuth strategies like Google, Facebook, Github, etc. We'll build an express app to demonstrate all use cases of authentication with passport.js. So let's begin quickly ✨
Passport.js
A simple, unobtrusive authentication for Node.js.
Passport is authentication middleware for Node.js. It is flexible, modular, and can be unobtrusively dropped into any Express-based application.
Its sole purpose is to authenticate requests through an extensive set of strategies. There are 480+ strategies that allow a user to log in. Passport does not mount routes or assumes any database schema. This allows flexibility for developers to build complex authentication systems using their own application-level choices.
To maintain a persistent login system, passport uses sessions. Though it is not required and depends upon your application.
Why use Passport?
- It's lightweight and feature-rich.
- Easy and unobtrusive usage.
- Supports persistent sessions.
- Many strategies including OAuth
- Flexibility in custom strategies.
Strategy ?
Passport uses a concept of strategy to authenticate users. It can range from a typical email/password called local-strategy to OAuth (Open Authentication) like Google, Facebook, etc. And also federated authentication using OpenID.
Here, first we'll learn about local-strategy and implement it. Then move to OAuth services.
Local Strategy
Using a local strategy means having more flexibility to create a custom strategy. Generally, we authenticate users with an email and password. Local strategy will be helpful in this case.
Overview
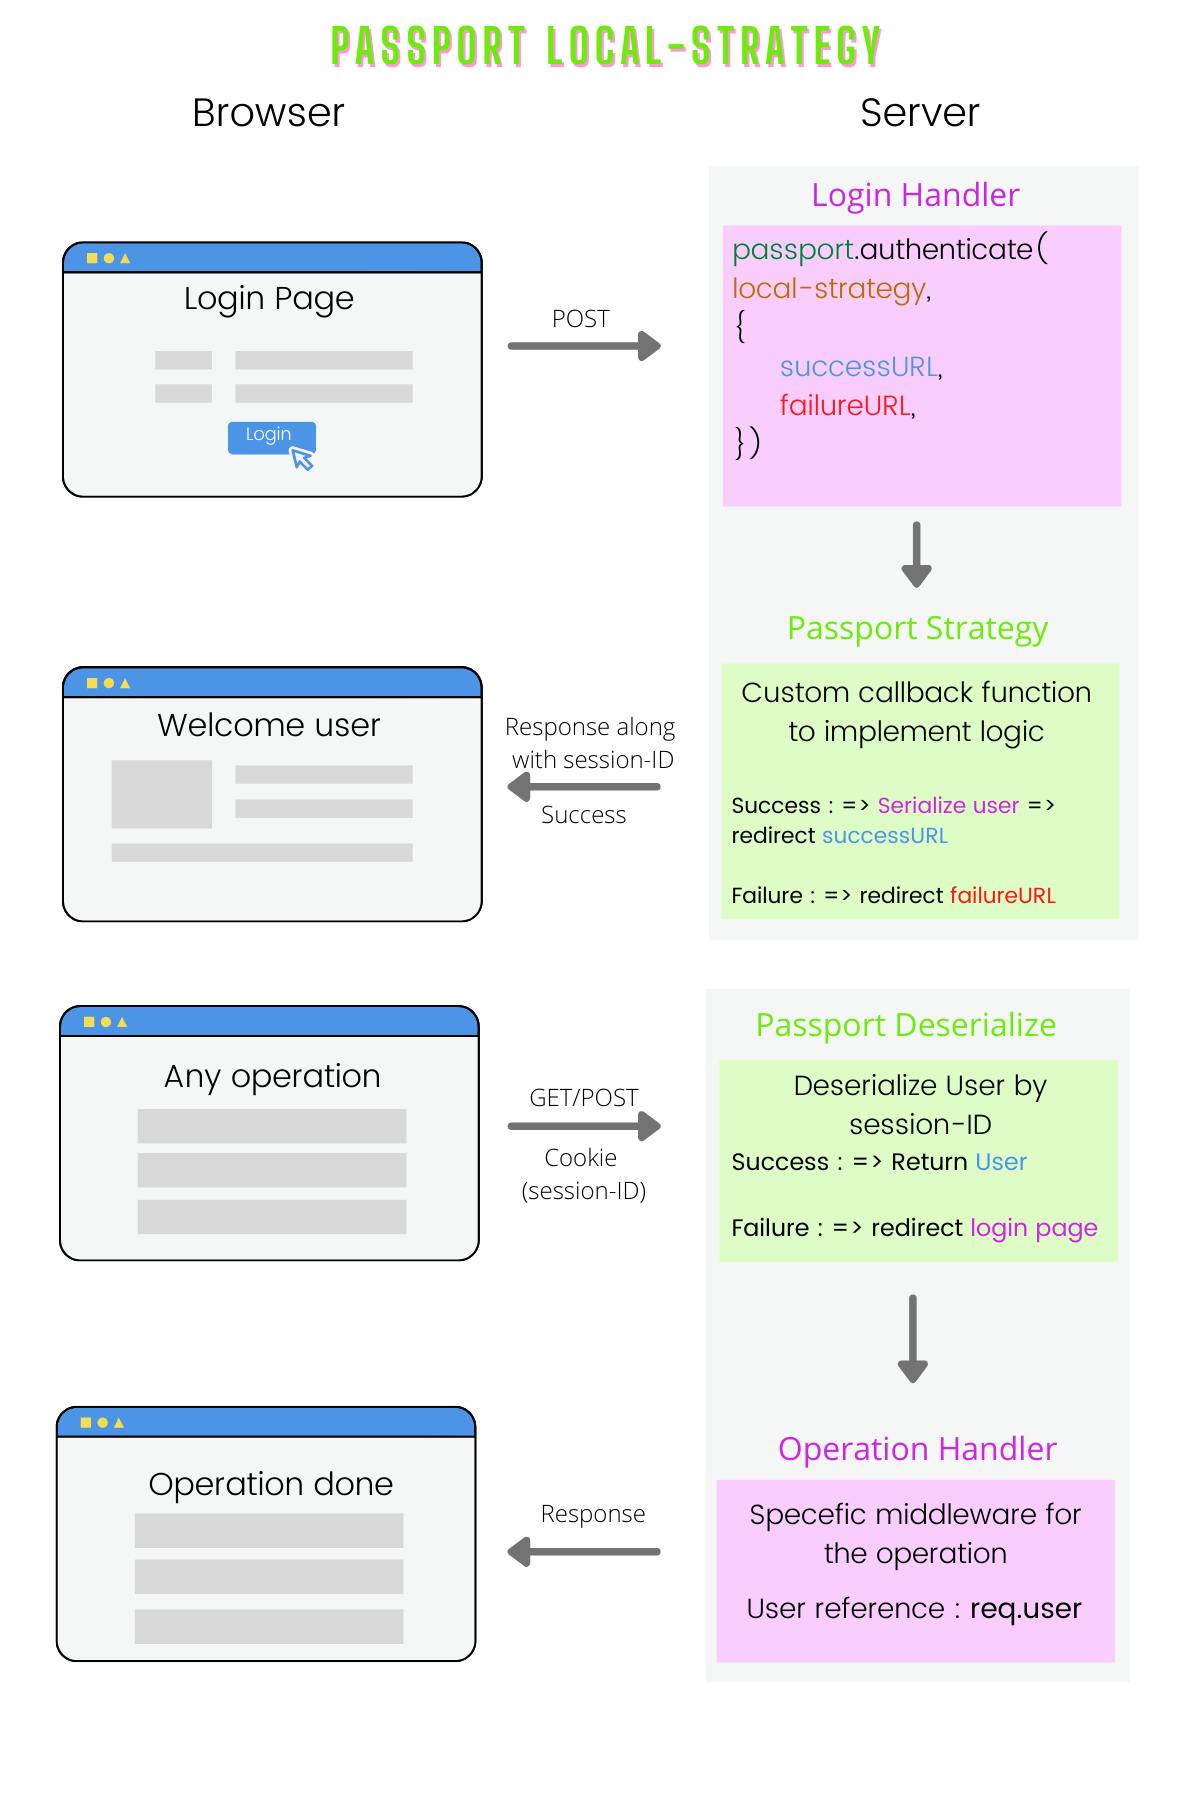
Let's understand what's happening here
Login request : When a new user visits a website, they are prompted to log-in. Here we are working with a local strategy i.e a typical email/password-based authentication. So the user needs to submit the form.
Authenticating middleware : To handle the POST login request, we use passport.authenticate() middleware provided by passport itself. It helps to authenticate a request by specifying which strategy to employ. The parameters we need to pass are strategy-name, successURL, and failureURL. Strategy name defines which strategy to be used for this authentication. It can be local or OAuth. By default after successful authentication, the next handler will be invoked along with req.user property set to the user. You can override this by providing successURL and failureURL. An optional failureFlash message parameter can also be passed.
Passport local-strategy : Before using authenticate middleware, we need to configure passport to use the local strategy. The strategy contains a strategy name, in this case, "local" and a callback function. The callback function is our main logic to authenticate users. We define this function such that if a user is validated, the user object is returned, else an error is returned. This brings high flexibility to develop your own logic and irrespective of any database you use. An important point to note here is that after successful authenticate, the user is serialized by user ID, so the passport will know how to identify this user from the database. Serialize function must also be configured depending on the developer. Finally, after all this user will be redirected to successURL or failureURL. Passport uses sessions, so a session ID will be sent to the client machine as a cookie.
Another request : When another request is sent, request headers contain the cookie (session ID) which helps passport to deserialize users. That means to find the user with a user ID and assign it to req.user property. After this next handler is invoked which is specific to that operation.
That was all about local strategy. Let's jump to OAuth now.
OAuth Strategies
Do you like the feature where, a website lets you sign-up/sign in with your Google, Facebook, or any other third-party service providers. That's what OAuth is.
What is OAuth?
OAuth is an open-standard authorization protocol or framework that describes how unrelated servers and services can safely allow authenticated access to their assets without actually sharing the initial, related, single logon credential. In authentication parlance, this is known as secure, third-party, user-agent, delegated authorization.
When trying to understand OAuth, it can be helpful to remember that OAuth scenarios almost always represent two unrelated sites or services trying to accomplish something on behalf of users or their software. All three have to work together involving multiple approvals for the completed transaction to get authorized.
It is also helpful to remember that OAuth is about authorization in particular and not directly about authentication. Authentication is the process of a user/subject proving its ownership of a presented identity, by providing a password or some other uniquely owned or presented factor. Authorization is the process of letting a subject access resources after successful authentication, oftentimes somewhere else. Many people think that OAuth stands for open authentication, but it’s more helpful to understand it by thinking about it as open AUTHorization.
Overview
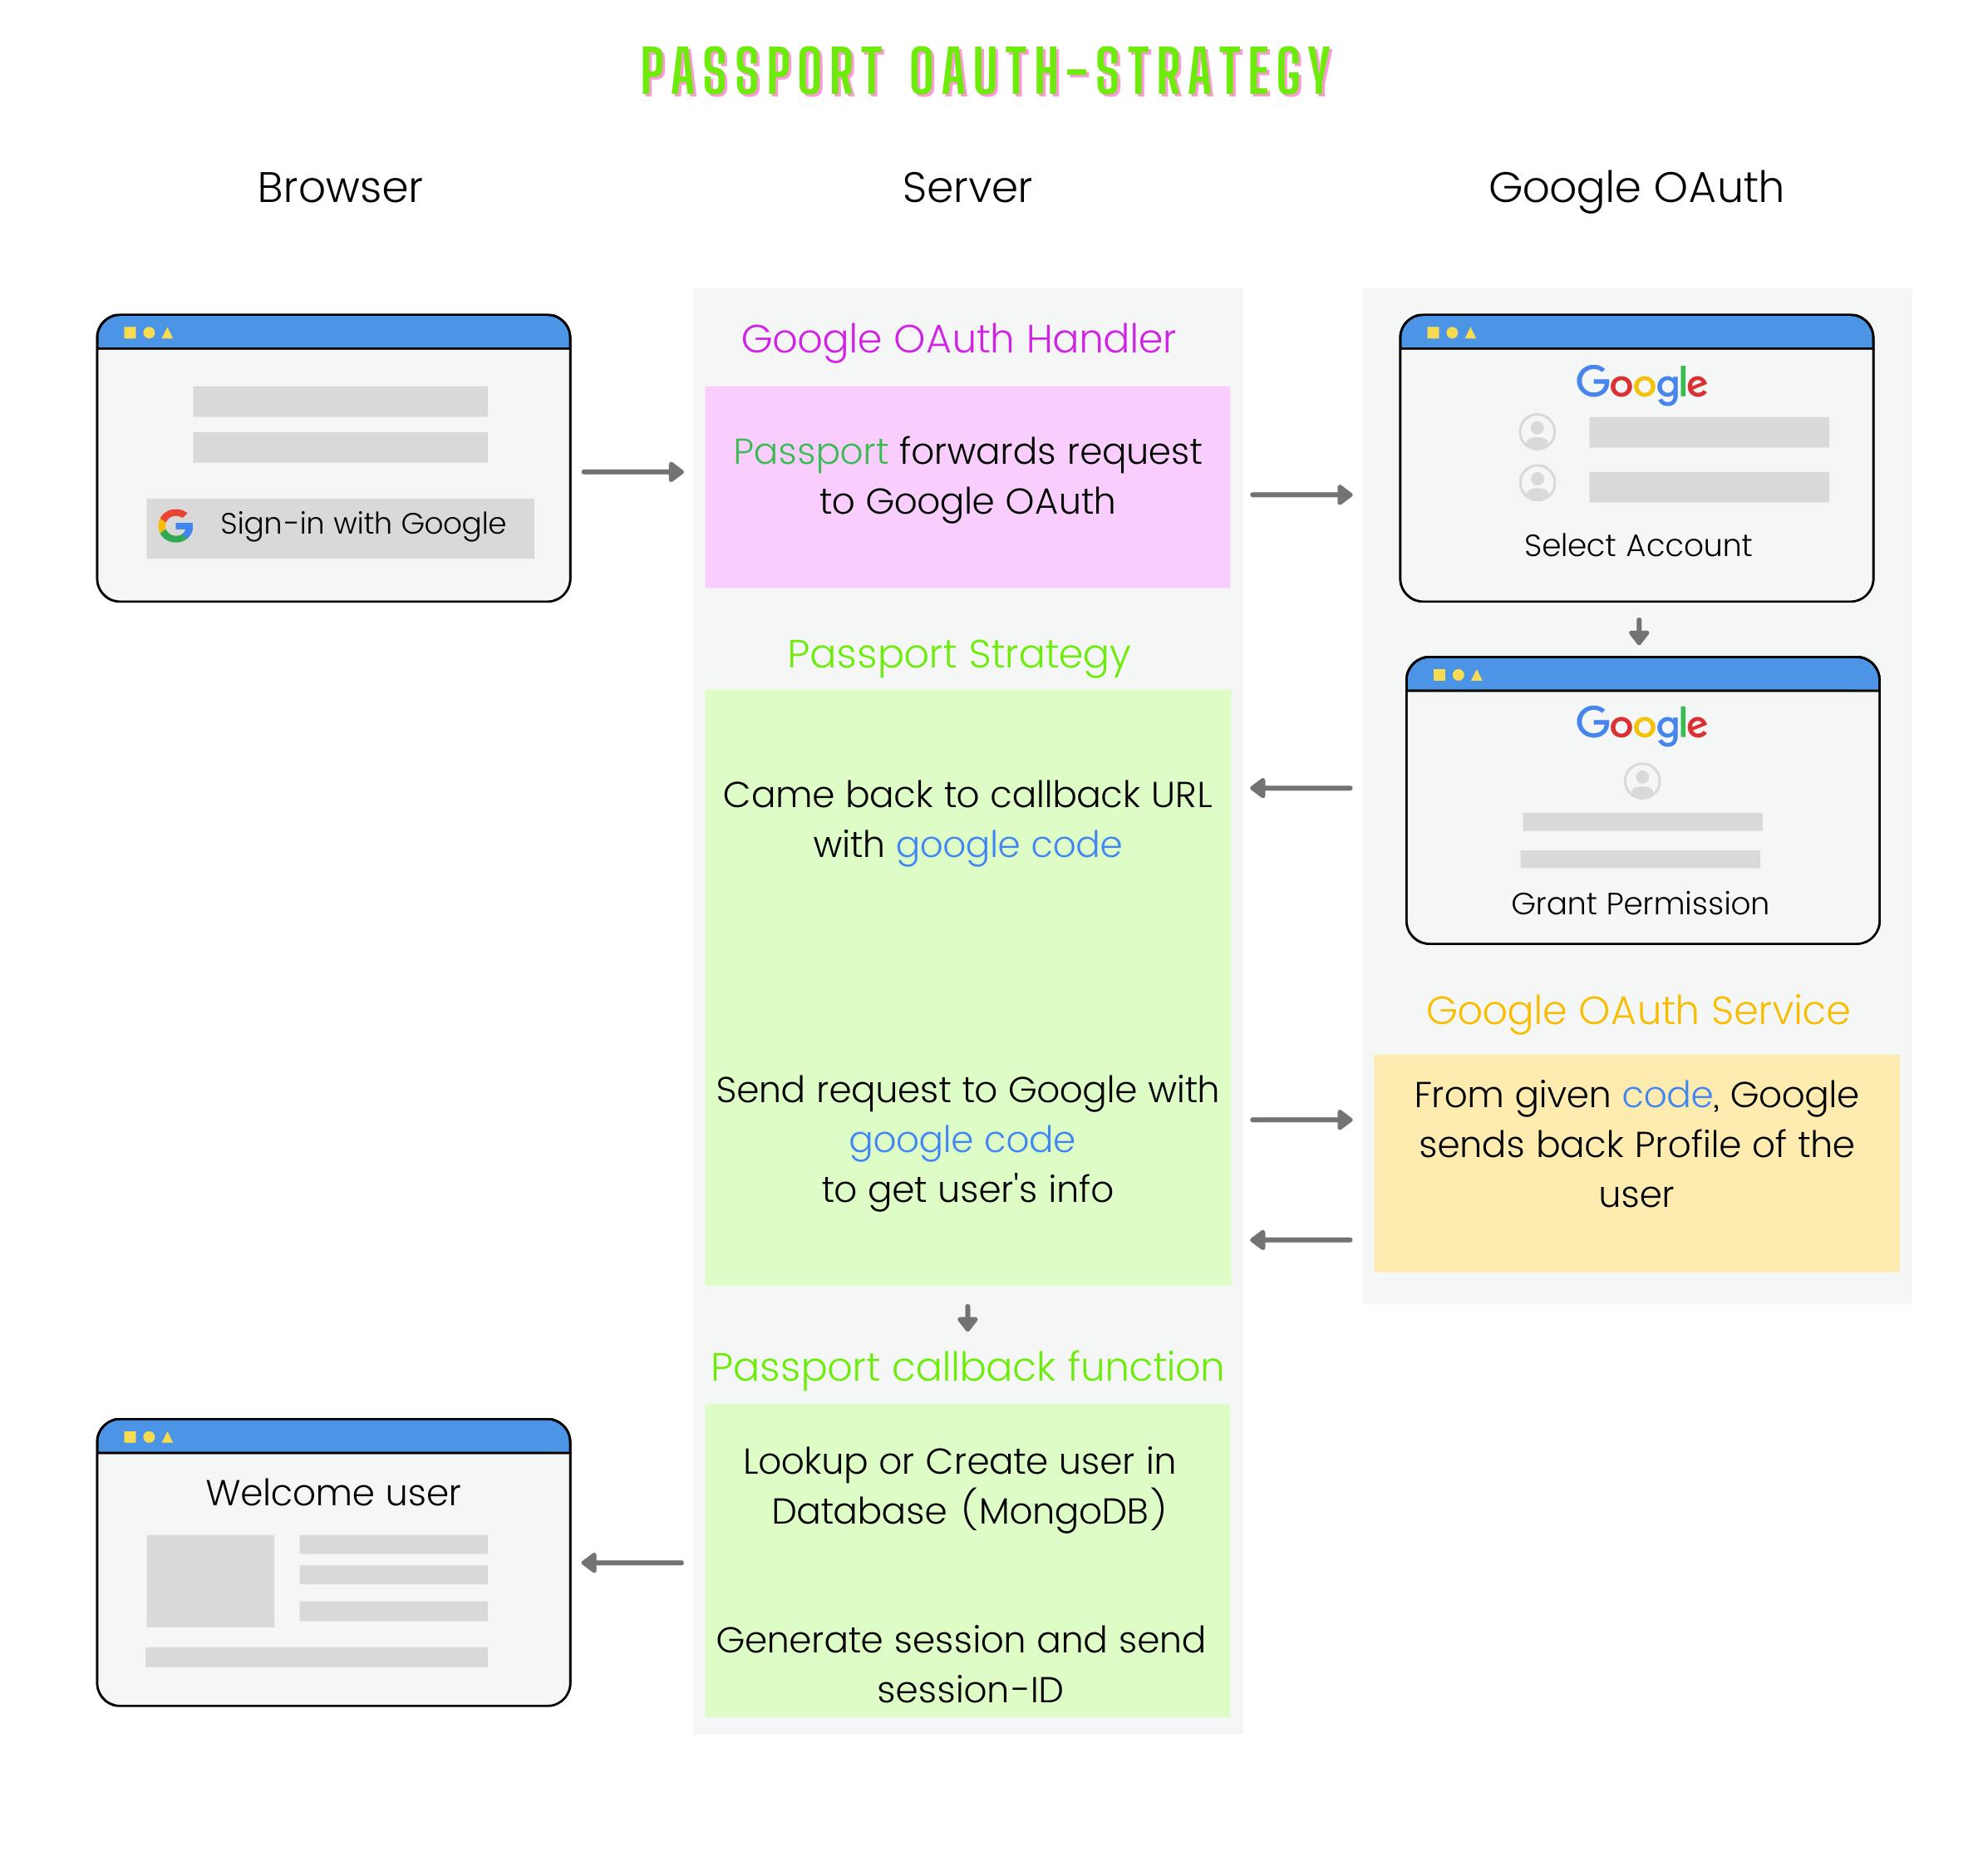
This is pretty much self-explanatory as you know how passport works.
Project
I have created a simple project which demonstrates the use of passport.js with local, Google OAuth, and Facebook OAuth strategies.
Here's my Github Repository link to it : - jaiswalrohan8796/nodejs-passport-auth
The readme contains all the necessary steps to run this project. Go ahead clone it on your local machine, get the required tokens and run.
For Google OAuth tokens, you need to create a project in Google Developer Console. Here's a guide.
This was all about Passport.js and OAuth. I hope you like it. Feel free to ping me for suggestions/improvements.
Thanks for reading.